

How I Host My Own Kiwix Archive
My own little corner of the internet dedicated to keeping information free, open and accessible.

This is just going to be a short explanation of how I personally host my Kiwix archive. For the purpose of this post it’s important to know a few things about my personal server:
It runs Debian Linux.
It already has Apache up and running because it hosts other services besides Kiwix.
My internet service provider does not filter/block incoming ports 80 or 443.
I’m using the regular Linux x86_64 binary executable, not the docker container.
The first order of business is to set up the user account that will house and run the Kiwix software. So I created a user with:
sudo useradd -m kiwix
This creates a user and their associated group and home directory.
Next I added the kiwix user to my custom “untrusted” group. I use this group for any services that I consider, well, untrustworthy; particularly things that may get accessed by the outside world like web services or Minecraft. The primary purpose is that this group is explicitly blocked, via an ACL, from accessing the contents of /mnt/storage, which is where my mass storage RAID array is mounted. So I added kiwix to this group with:
sudo usermod -a -G untrusted kiwix
Next I “locked” the account, and set its shell to a non-interactive one to help prevent any out of band shell execution:
sudo usermod -L kiwix
sudo usermod -s /usr/sbin/nologin kiwix
Next I just become root for the next several tasks to make life a little easier for a moment:
sudo su -
And cd into the kiwix home directory:
cd /home/kiwix
I downloaded the kiwix software using wget from their website at:
https://kiwix.org/applications/
I then extracted the folder with:
tar -xvf filename.tar.gz
This gives me a folder with the Kiwix binaries inside it. By default the folder name included the version number; which I removed so that the folder is just named “kiwix-tools”. Doing this means I won’t have to modify the systemd service file every time I update the kiwix software.
Next I created the systemd service file with:
sudo nano /etc/systemd/system/kiwix.service
This file contains all the directives to start and stop the Kiwix service:

Next I staged the folder on my storage array for storing the ZIM files Kiwix will read from and placed all my ZIM files in it. You might remember earlier that the kiwix user can’t see this folder. The solution to that is I next created an empty “zim” folder within the kiwix home folder:
mkdir zim
Next, I applied an ACL to the source folder on the storage array where the ZIM files are stored that allows the kiwix user to read from that folder:
sudo setfacl -R -m u:kiwix:rx /mnt/storage/Backups/Kiwix
Next I bind mounted that location into the /home/kiwix/zim folder. By doing a bind mount, this allows the ACL of the child to take priority over the ACL of the parent when accessing the files thru the bind mount, allowing the kiwix user to see the ZIM files, but without giving it read access to anything else on the storage array.
sudo mount -o bind /mnt/storage/Backups/Kiwix /home/kiwix/zim
And add that mount operation to /etc/fstab so that it happens automatically at boot.

Next I “reloaded” systemd to get it to see the new service file, then “enabled” the service so that it’ll auto start on boot, but I didn’t start it just yet.
sudo systemctl daemon-reload
sudo systemctl enable kiwix
The next task is to set up an Apache host for Kiwix. The kiwix-serve binary only supports hosting with unencrypted/unauthenticated http, as best I can tell, and though it defaults to port 80, you can see in the systemd service file above that I changed that to 8080. I’m already using Apache to host other services that listen on port 80, so I just created a new Apache host specifically for Kiwix and configured it act as a reverse proxy. We’re going to create two Apache virtual hosts, one unencrypted http for certbot to verify ownership, and one https to actually serve the files.
sudo nano /etc/apache2/sites-available/kiwix.conf
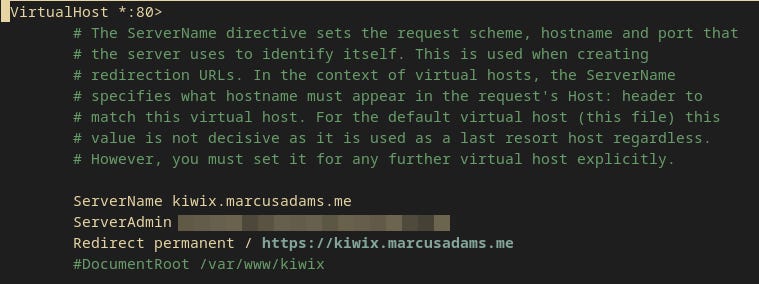
I honestly just copied an existing generic configuration I already had from another service and modified it accordingly. All this first file does is redirect to the https page anyway so you don’t even need to specify a DocumentRoot. But in order to verify that you own the domain, certbot has to see that “something” is listening on port 80, even if it’s just a redirect, so all this file contains is:
The next file is the important one though. Again, I’ve got existing templates for my https services so I just copied one over and modified the entries accordingly.
sudo nano /etc/apache2/sites-available/kiwix-ssl.conf
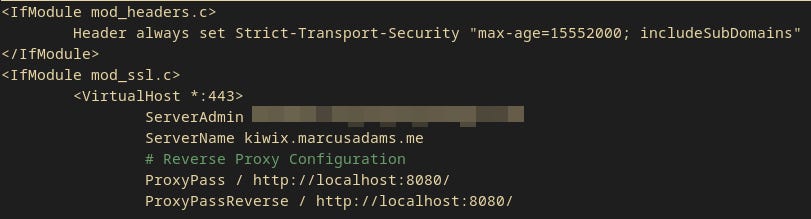
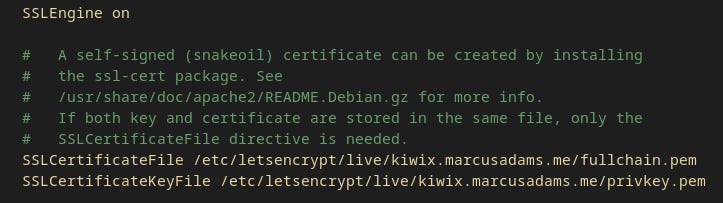
The important parts here are the “ProxyPass” and “ProxyPassReverse” lines, and further down the location of the SSL certificates. Again you can leave a DocumentRoot out completely because Apache isn’t hosting any files itself, it’s just going to act as a proxy.
Next I needed to make sure the appropriate proxy mods were enabled:
sudo a2enmod proxy
sudo a2enmod proxy_http
I think the “rewrite” mod may also be required for this to work, but it was already enabled so I didn’t worry about checking.
Next I needed to enable the unencrypted site in preparation for certbot.
sudo a2ensite kiwix
sudo systemctl reload apache2
sudo systemctl restart apache2
I’m pretty sure the “reload” also “restarts” apache2, but I figured it doesn’t hurt to make sure.
Next was to request the TLS/SSL certificate. I’ve already got certbot installed because it manages certs for my other services, and I’ve already got a wildcard domain name from NoIP so I can make up any domain name I want and just prepend it to my domain. Since this is a kiwix archive, I just stuck kiwix on the front and used certbot to get a certificate with:
sudo certbot --apache -d kiwix.marcusadams.me certonly
This did everything necessary and put the certificates in the folder I specified in the Apache configuration above. Before continuing however, I did need to generate a valid xml file for kiwix to read from. So while cd’d into /home/kiwix/kiwix-tools I just ran:
./kiwix-manage library_zim.xml add /home/kiwix/zim/*.zim
Since this was the last change made to any of the files in /home/kiwix I needed to fix permissions to make sure the kiwix (non-root) has permissions to execute the binaries:
sudo chown -R kiwix:kiwix /home/kiwix/kiwix-tools
Finally I just enabled the SSL version of the site, reloaded Apache and exited root mode in the terminal.
sudo a2ensite kiwix-ssl
sudo systemctl reload apache2
sudo systemctl restart apache2
exit
It was then safe to go ahead and start the service with:
sudo systemctl start kiwix
I do most maintenance tasks on the server with a regular non-root user that has sudo privileges, so within the home directory of that user I wrote a script, kiwixlib.sh, that automatically re-scans my ZIM folder for fresh files, makes sure the ACL is applied to all of them, creates a new XML file and restarts the service.

So from now on if I add any new ZIM files, all I have to do is open Remmina, double click the server shortcut I have in there and run:
sudo ./kiwixlib.sh
That will take care of bringing the new media into my Kiwix site.
Anyway, I just wanted to share how I set up my own Kiwix library portal on my personal/home server.
Donate
If you’d like to donate to me, you can either become a paid subscriber thru Substack (link below), or you can use one of these following methods.
PayPal: https://paypal.me/gerowen
Bitcoin (BTC): bc1q86c5j7wvf6cw78tf8x3szxy5gnxg4gj8mw4sy2
Monero (XMR): 42ho3m9tJsobZwQDsFTk92ENdWAYk2zL8Qp42m7pKmfWE7jzei7Fwrs87MMXUTCVifjZZiStt3E7c5tmYa9qNxAf3MbY7rD